How to Create the Ghost Mannequin Effect in Photoshop (and Why Most Brands Are Moving On)
By Snaproom · April 26, 2026 · 9 min read
The ghost mannequin effect, a garment photographed so it appears to float on an invisible body, holding its full shape with no model or hanger in sight, has been the default product image for fashion ecommerce for over a decade. Amazon prefers it. Shopify category pages live or die by it. Wholesale buyers expect it on every linesheet. For a deeper look at why this format dominates the category, see our complete guide to ghost mannequin photography.
For most of that decade, the only way to produce one was Photoshop. A retoucher would mask the mannequin out of a studio photo, composite the inner neckline back in from a second shot, clean up the edges, and export to spec. A skilled editor could turn around ten to fifteen garments a day. The technique earned its place because nothing else worked.
That's no longer true. AI tools can now produce a ghost mannequin shot from a single hanger photo in under a minute, with output quality that holds up next to manual retouching for the majority of fashion categories. But the Photoshop method still has a place, and even brands using AI workflows benefit from understanding how the manual technique works, because that's where the quality bar was set.
This guide walks through the full Photoshop process step by step, gives an honest assessment of how long it actually takes per garment, and explains the specific cases where Photoshop is still the right answer in 2026. If you're deciding whether to learn the technique, outsource it, or move to an AI tool, you'll have a clear answer by the end.
Before opening Photoshop, you need source images and the right setup. The output is only ever as good as the input, and the most common reason brands give up on the manual workflow is that they tried to retouch a bad source photo into a clean ghost mannequin shot.
You need at least two photographs of every garment:
Some garments need a third shot, usually for cuffs on long-sleeved shirts where the inner cuff would be visible in a worn fit. Most ghost mannequin shoots skip this for time and accept slightly less interior detail at the wrists.
This is the step most brands rush, and it's the single biggest determinant of how long the Photoshop work takes. A garment that's been steamed, lint rolled, and styled carefully on the mannequin can be retouched in 30 to 45 minutes. The same garment shot wrinkled and badly draped takes two hours and still looks worse.
Spend ten minutes per garment on the prep. Smooth the shoulders. Pull the side seams straight. Tuck the inner labels out of sight. Make sure the front placket sits flat and the buttons are aligned. The retoucher cannot fix what the camera captured.
What follows is the standard professional workflow used by retouching studios. The exact tools differ between editors, some prefer Pen Tool selections, others use Select Subject and refine, but the sequence is the same.
Open the main mannequin shot and the inner neck shot in Photoshop as separate documents. Bring the inner neck shot into the main document as a new layer above the background. Set the inner neck layer's opacity to around 50% temporarily so you can see both layers, then move and rotate the inner neck shot until the neckline alignment matches the main shot.
The two shots will rarely align perfectly because they were taken at slightly different angles. Use Edit > Free Transform with Warp mode (or Edit > Puppet Warp for more complex curves) to nudge the inner neck shot into alignment with the main shot's neckline. Reset the layer opacity to 100% once the alignment looks right.
With the inner neck layer selected, add a layer mask. Using a soft black brush at around 70% opacity, paint out everything in the inner neck layer except the section that will show inside the collar of the main garment.
The trick is to leave a small amount of overlap, maybe two or three millimetres, where the inner neck section meets the outer collar of the main shot. This overlap gets cleaned up later and is what creates the seamless transition between the outside and inside of the garment.
Hide the inner neck layer for now. Select the main shot layer and create a precise mask around the garment.
This is where most of the time goes. The standard professional approach:
For most knitwear, t-shirts, and structured tops, the Pen Tool produces the cleanest result. For garments with complex edges, knit fringing, lace trim, sheer panels, switch to Select and Mask with the Refine Edge brush after the initial Pen Tool selection. Refine Edge handles fine detail that Pen Tool selections lose.
Re-enable the inner neck layer once the main shot mask is complete. The inside of the collar should now show through the masked-out neckline.
Zoom in to 200% and walk around the entire garment edge. Look for:
Edge refinement is what separates a $4 ghost mannequin retouch from a $40 one. The first one looks AI-generated in the bad sense. The second one looks like a studio shoot.
Add a pure white solid colour fill layer below the garment and inner neck layers. The garment now floats against true white.
Check the white balance against the reference image of the actual garment. If the garment has shifted warmer or cooler in editing, add a Curves adjustment layer clipped to the main shot layer and correct the cast. Ghost mannequin shots that don't match the real garment's colour are the most common reason returns come in citing "not as pictured."
Many marketplaces look better with a subtle shadow beneath the garment to ground it visually. Some require a pure white background with no shadow at all (Amazon historically). Check the spec for your primary sales channel before adding one.
If you do add a shadow, keep it subtle, around 15-20% opacity, soft edge, directly below the garment with no offset. Use a separate shadow layer rather than a layer style so you can adjust per channel without redoing the work.
Flatten the file, then export at the resolution your platform requires. Standard ecommerce specs:
Save a layered PSD master file before flattening. You will need to come back to it when the garment colour shifts in production, when a sample arrives looking different, or when a buyer requests a different background.
Honest numbers for a competent retoucher with a well-prepared source photo:
| Stage | Time |
|---|---|
| Layer alignment and inner neck masking | 5–10 minutes |
| Pen Tool selection of garment | 15–25 minutes |
| Edge refinement | 10–20 minutes |
| Colour correction and white balance | 5–10 minutes |
| Background and shadow setup | 5 minutes |
| Export and quality check | 5 minutes |
| Total per garment | 45–75 minutes |
Beginners should expect to spend two to three times this until the muscle memory builds. A retoucher who does this every day gets to the lower end of that range, and a few exceptional editors can do clean ghost mannequin work in under 30 minutes per garment for simple knitwear. Anything below that is either cutting corners or working with unusually clean source files.
For a brand with 50 SKUs and three angles per garment (front, back, inner detail), that's 150 images. At 60 minutes per image, you're looking at 150 hours of retouching time. Even at outsourced rates of $4 to $8 per image, you're spending $600 to $1,200 per shoot on retouching alone, on top of photographer fees, studio rental, and mannequin costs.
Upload one garment photo. Get a ready-to-publish ghost mannequin shot, no masking required.
Try Ghost Mannequin Free →Until around 2024, AI ghost mannequin tools produced obviously synthetic results. The garment edges looked rubbery. The inner necklines hallucinated detail that didn't exist. Colours shifted unpredictably. Most professional brands tried them, dismissed them, and went back to Photoshop.
What changed is the underlying generative models. Modern image editing models have been trained specifically on garment construction, fabric drape, and the physics of how clothing falls on a body. A 2026 AI ghost mannequin tool doesn't generate a synthetic-looking garment from scratch, it segments your real garment from the source photo, infers the three-dimensional shape it would take if worn, and inpaints only the specific missing detail (typically the inside of the collar and any obscured drape lines). For a fuller breakdown of how this format works across the category, see our ghost mannequin photography guide.
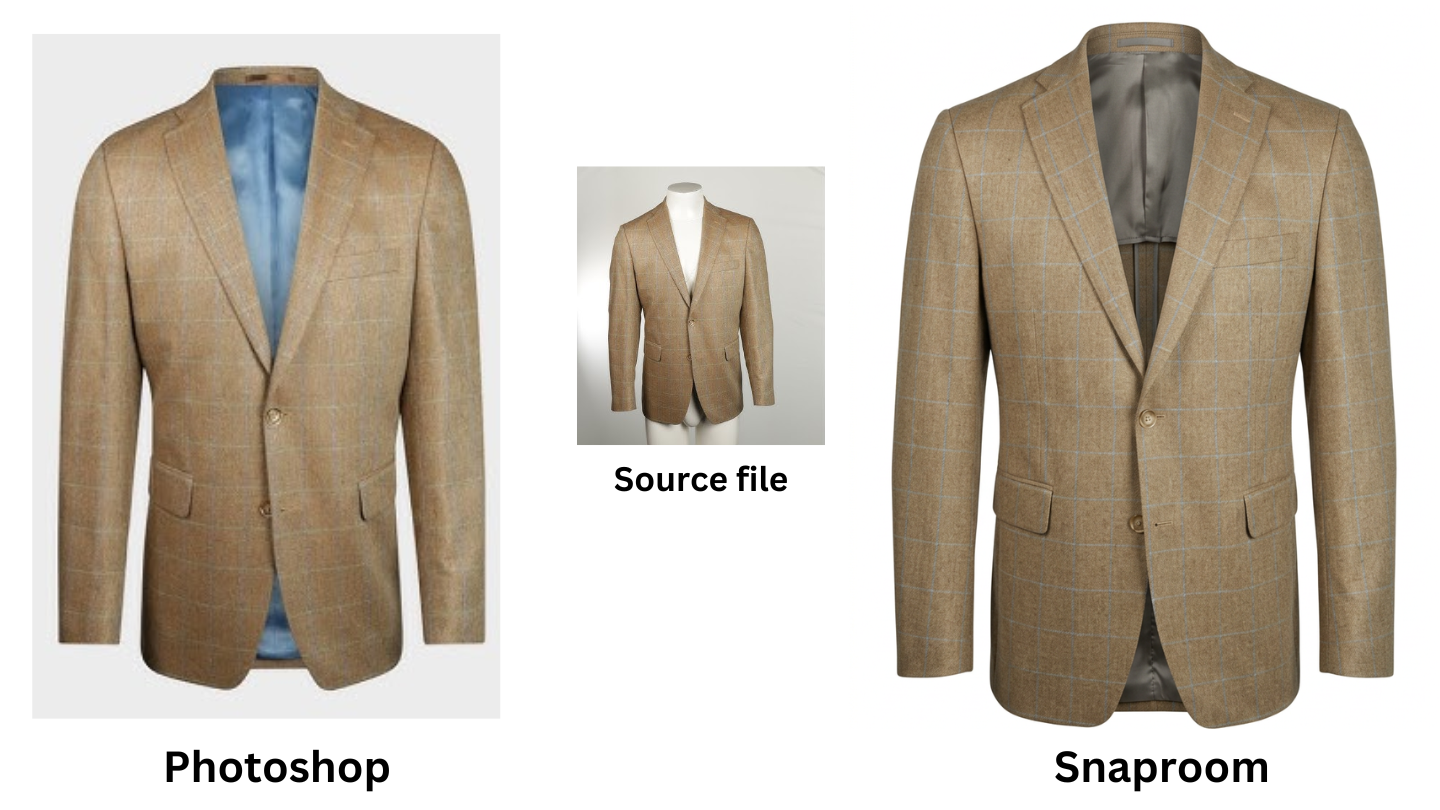
The practical result: for most fashion categories, knitwear, t-shirts, hoodies, button-up shirts, blazers, jeans, skirts, structured outerwear, the AI output is now indistinguishable from professional Photoshop retouching. Side-by-side blind tests have stopped being interesting because experienced retouchers can no longer reliably tell which is which.
Three categories continue to challenge AI tools and remain stronger candidates for manual Photoshop work:
For these categories, the answer is usually a hybrid workflow: AI for the 80% of the catalogue it handles cleanly, manual retouching for the remaining 20%.
There are specific situations where the manual Photoshop workflow continues to make sense in 2026:
If your catalogue is heavy on sheer eveningwear, sequinned cocktail dresses, or complex layered pieces, you'll be retouching by hand whether you like it or not. Build the muscle.
For the single most important image on a brand campaign, the one that goes on the homepage hero, the email header, the paid ad, manual retouching gives you pixel-level control over every edge, shadow, and colour transition. AI tools produce an excellent average result. Photoshop produces exactly what you decide it should produce.
If you already employ a skilled retoucher and your catalogue turns over slowly (twice a year, classic styles), the per-image cost of manual retouching is sunk in salary. The marginal savings from switching to AI are smaller, and the workflow disruption may not be worth it. Many heritage brands are in this position.
For product imagery that needs to match an exact specification (regulated medical wear, uniforms with specific compliance requirements, technical sportswear with claims that must be visually substantiated), manual retouching gives you a documented, repeatable, defensible process. AI outputs vary slightly between generations, which can be a problem for high-stakes imagery.
For everyone else, the small Shopify brand, the print-on-demand t-shirt seller, the boutique with 200 SKUs and a six-week production cycle, AI is now the right answer, and Photoshop is the legacy method.
A simple way to decide:
Choose Photoshop (or outsourced manual retouching) when:
Choose AI when:
Most small fashion brands fall cleanly into the second column. The brands that should still be using Photoshop in 2026 know exactly who they are, they have specific reasons rooted in their catalogue mix or production constraints, not nostalgia for the old workflow.
A few mistakes show up repeatedly in ghost mannequin retouching, even from experienced editors. Knowing them in advance saves hours of rework.
Mistake 1: Cutting too tightly around the garment edge.
A mask that hugs the garment edge too tightly produces a hard, cut-out look. Always feather selections by 0.3 to 0.7 pixels, enough to soften the edge transition without losing detail.
Mistake 2: Missing the neckline cut-out.
The most common workflow error is masking the garment outline cleanly but forgetting to cut the neckline opening out of the mask. The result is a ghost mannequin shot with a solid collar, the inner neck layer behind it is invisible because nothing has been masked away to reveal it.
Mistake 3: Inner neck composite that doesn't match the lighting.
If the inner neck shot was taken under different lighting from the main shot, the composite will look obviously wrong even when it's geometrically perfect. Always shoot both images in the same session, with the same lights, against the same background. If you have to use a mismatched inner neck shot, expect to spend 10 to 15 minutes on Curves adjustments to bring the lighting into alignment.
Mistake 4: Skipping the back view.
Even when you only need a front shot for the category page, generate the back and side views at the same time. Customers click into product galleries expecting to see the back of a garment. A missing back view increases returns because customers can't verify the fit before buying.
Mistake 5: Treating each garment as a fresh project.
Set up a master Photoshop action that handles your standard adjustments, colour space, output sharpening, export specs. Save your typical Pen Tool path widths, brush settings, and mask refinements as presets. Ten minutes spent building the action saves five minutes per garment forever. AI batch tools like a smart retouch tool solve the same batch consistency problem from the other direction by enforcing identical white balance, sharpness, and lighting across an entire catalogue automatically.
The Photoshop ghost mannequin workflow is a craft. Done well, it produces flawless product imagery with full creative control. It also takes 45 to 75 minutes per garment, requires meaningful skill, and scales linearly, every new SKU is another hour of editor time.
The AI alternative produces output of comparable quality for most fashion categories in under a minute, at a fraction of the cost. The cases where Photoshop still wins are real but narrow: highly technical garments, heritage brands with stable catalogues and in-house retouchers, and high-stakes hero imagery where pixel-level control matters more than turnaround time.
If you're a small Shopify brand evaluating which workflow to commit to in 2026, the answer is almost certainly AI for your standard catalogue work. Reserve Photoshop for the 10 to 20% of garments where it genuinely earns its place. That's the workflow most successful small brands are running, and it's why ghost mannequin photography has stopped being a barrier to launching new SKUs.
Upload one garment photo. Get a ready-to-publish ghost mannequin shot, no masking required.
Try Ghost Mannequin Free →Generate clean, professional ghost mannequin images from any garment photo in under 30 seconds.
Try it freeStudio-grade retouching for clothing photos with consistent white balance, sharpness, and lighting across your entire catalogue.
Learn more →Generate front, back, and side views from a single product photo to complete your product gallery.
Learn more →